Author: Anna Ravenelle
Each week on “The Crafting Diaries,” Anna Ravenelle scours Pinterest looking for exciting projects that claim the average crafter (and/or college student) should be able to accomplish – and then sets out to prove them wrong. Usually failing in her crafting efforts, Anna works to flesh out the instructions of complicated projects so that you (yes, you!) can avoid failure where she did not.
Right before winter break, I did some end-of-semester cleaning. I think everyone would agree – there isn’t enough room in a Cornell dorm for clutter. As I was throwing stuff in bags to cart home, I came across a pair of old canvas look-a-like Keds I bought from Target years ago. As you can see, they’re pretty beat up.

Slope Media | Photographer: Anna Ravenelle
I can’t remember the last time I wore them, but I’ve brought them to school with me for the last two years, so I think a part of me always cared for the sad, dirty shoes. That being said, I decided to re-vamp them a little. Or a lot. Taking some different ideas from this collection put together by Sarah Tan over at Bustle, I completely overhauled them with supplies I already had lying around my room.
Supplies needed:
- Canvas sneakers – Keds, Toms, etc. will all work
- Nail polish remover, cotton balls
- Acrylic paints, paintbrushes
- Mod Podge (sealant)
The first thing you’ll want to do is clean the rubber midsole with the nail polish remover. It might take some scrubbing, but the difference is incredible. Case in point, this one half-cleaned:

Slope Media | Photographer: Anna Ravenelle
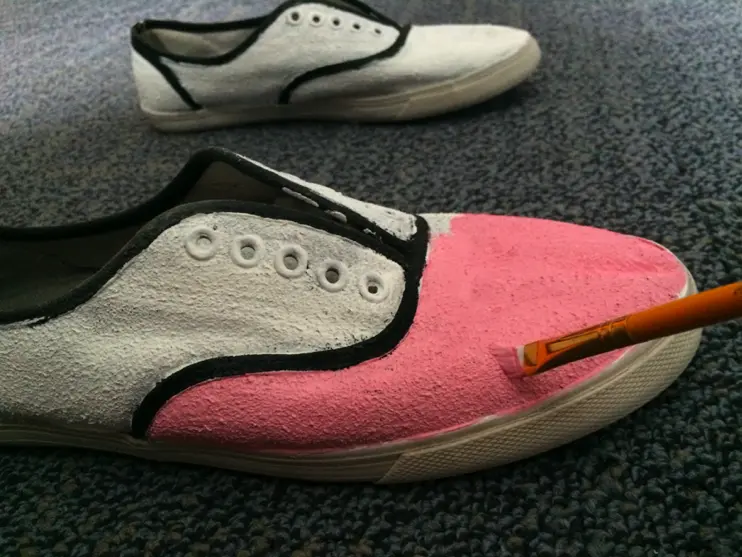
Once it’s cleaned to your satisfaction, you can remove the shoelaces (if your shoes have them) and begin painting. I began each shoe a different way: the first I primed with white paint and then mod podged over the base layer, and the second I coated with mod podge and then painted the white over it. Both methods work fine, but I would recommend mod podging first and then painting because you’ll use a lot less paint when priming.
Keep in mind that I only primed mine in white first because my starting color was dark and patterned. If your shoes are very light or a color you already like, feel free to skip this step.

Slope Media | Photographer: Anna Ravenelle
At the time of this photo, I was still unsure about what I would do with the black piping. I eventually also primed it with white before beginning the next step: the body color.
I decided on nice light pink to go for Spring thinking during these below-zero days. I personally did only one base color – but this is where your personality can really start to shine. Stripes, gradients, color blocking – do whatever speaks to your sense of style! Make sure you get the tongue as well, because that’s something I forgot when I did my first coats.
Slope Media | Photographer: Anna Ravenelle

Slope Media | Photographer: Anna Ravenelle
Once your shoes are completely colored in your chosen body color , it’s time for the true art to come out. I went with the “Lilly Pulitzer” style flowers I learned how to paint from Taylor Horvat at Her Campus.
Her method is a little more technical than mine; basically, I paint a big dark blob of whatever color I want my flowers to be (for these shoes, blue), then add crescent swipes of various lighter shades until I get something I like. If you use flowers, I recommend painting one flower at a time so the wet paint will swirl together nicely, but planning out where each flower will be beforehand is a great method also. For instance, the toe of this shoe went from a blue blob to a flower-print in about ten seconds flat.

Slope Media | Photographer: Anna Ravenelle

Slope Media | Photographer: Anna Ravenelle
Repeat until your desired look is achieved.

Slope Media | Photographer: Anna Ravenelle
For some extra color, I added some green leaves in small, rounded triangles going off random angles from the flowers in varying dark and light shades of green.

Slope Media | Photographer: Anna Ravenelle
Happy with my paint job, I mod podged all over both shoes and let them dry. Now I have a pair of shiny, new-to-me shoes that will be perfect for this spring!

Slope Media | Photographer: Anna Ravenelle